Showing posts with label java. Show all posts

Saturday, December 23, 2017

Developers Needs SDKMAN Not Super-Man


Every developer has pain for setup development environment to his/her machine with lots of the setups. Sometimes, the pain goes beyond while we need to test same application on multiple versions of sdks or virtual machines.


If you are a Mac user, you have the best option called brew installer.


But if you are Linux user, your pain is unpredictable. 


We are Java developers and Linux users and have the same pain for setting development environment with lots of configuration and different versions virtual machines.

For the sake of innocent developers, for the sake of time, we are going to introduce our superhero called SDKMAN. Which saves us from the cruel world of setup developments tools.


Technical Introduction:  


SDKMAN! is a tool for managing parallel versions of multiple Software Development Kits on most Unix based systems. It provides a convenient Command Line Interface (CLI) and API for installing, switching, removing and listing Candidates. SDKMAN is primary used for JVM based languages and framework. In future, they were plan to move SDKMAN for other environments as well. Currently SDKMAN have a huge list of sdks, which we get from here

Install SDKMAN

$ curl -s "https://get.sdkman.io" | bash

$ source "$HOME/.sdkman/bin/sdkman-init.sh"

$ sdk version

Install Java

For installing java, SDK provide simple and easy command as below:


$ sdk install java

Downloading: java 8u152-zulu

In progress...

######################################################################## 100.0%

Repackaging Java 8u152-zulu...

Done repackaging...

Installing: java 8u152-zulu
Done installing!


Setting java 8u152-zulu as default.
root@a33316a976d9:~/.sdkman# java -version
openjdk version "1.8.0_152"
OpenJDK Runtime Environment (Zulu 8.25.0.1-linux64) (build 1.8.0_152-b16)
OpenJDK 64-Bit Server VM (Zulu 8.25.0.1-linux64) (build 25.152-b16, mixed mode)

By default, sdkman download the zulu or open source JDK of java. But if we require installing some specific version of JDK or Specific Oracle JDK, what can we do???


SDKMAN gave us the way to download sdk's with specific versions as well. We can easily list out the existing SDK's which SDKMAN support and install it as per requirements.


$ sdk list

================================================================================
Available Candidates
================================================================================
q-quit                                  /-search down
j-down                                  ?-search up
k-up                                    h-help

--------------------------------------------------------------------------------
Ant (1.10.1)                                             https://ant.apache.org/

Apache Ant is a Java library and command-line tool whose mission is to drive
processes described in build files as targets and extension points dependent
upon each other. The main known usage of Ant is the build of Java applications.
Ant supplies a number of built-in tasks allowing to compile, assemble, test and
run Java applications. Ant can also be used effectively to build non Java

So on ...................

$ sdk list java

================================================================================
Available Java Versions
================================================================================
     9.0.1-zulu                                                                    
     9.0.1-oracle                                                                  
     9.0.0-zulu                                                                    
 > * 8u152-zulu                                                                    
     8u151-oracle                                                                  
     8u144-zulu                                                                    
     8u131-zulu                                                                    
     7u141-zulu                                                                    
     6u93-zulu                              
	 
$ sdk install java 8u151-oracle

Oracle requires that you agree with the Oracle Binary Code License Agreement
prior to installation. The license agreement can be found at:

  http://www.oracle.com/technetwork/java/javase/terms/license/index.html

Do you agree to the terms of this agreement? (Y/n): y


Downloading: java 8u151-oracle

In progress...

######################################################################## 100.0%

Repackaging Java 8u151-oracle...

Done repackaging...

Installing: java 8u151-oracle
Done installing!

Do you want java 8u151-oracle to be set as default? (Y/n): y

Setting java 8u151-oracle as default.

$ java -version
java version "1.8.0_151"
Java(TM) SE Runtime Environment (build 1.8.0_151-b12)
Java HotSpot(TM) 64-Bit Server VM (build 25.151-b12, mixed mode)

As it shows, we can install oracle java successfully. But, at the start of this blog, as we discussed we can install multiple version of the same SDK easily and manage easily. If we go through the blog again, first we install OpenJDK after we are installing OracleJDK, single machine multiple JDKS and we also set OracleJDK as default, so how can we use OpenJDK as per our requirements??

Below are powerfull and ease commands of SDKMAN which help us to achieve this functionality.


$ sdk list java

================================================================================
Available Java Versions
================================================================================
     9.0.1-zulu                                                                    
     9.0.1-oracle                                                                  
     9.0.0-zulu                                                                    
   * 8u152-zulu                                                                    
 > * 8u151-oracle                                                                  
     8u144-zulu                                                                    
     8u131-zulu                                                                    
     7u141-zulu                                                                    
     6u93-zulu                                                                     


================================================================================
+ - local version
* - installed
> - currently in use
================================================================================


$ java -version
java version "1.8.0_151"
Java(TM) SE Runtime Environment (build 1.8.0_151-b12)
Java HotSpot(TM) 64-Bit Server VM (build 25.151-b12, mixed mode)

$ sdk use java 8u152-zulu

$ java -version
openjdk version "1.8.0_152"
OpenJDK Runtime Environment (Zulu 8.25.0.1-linux64) (build 1.8.0_152-b16)
OpenJDK 64-Bit Server VM (Zulu 8.25.0.1-linux64) (build 25.152-b16, mixed mode)

I am sure, now you can feel the power of SDKMAN and how easy is using this tool. This makes developers life happy and safe.


References: 

  1. http://sdkman.io/index.html
  2. Thanks to google funny images.

Thursday, March 23, 2017

Multiways for communicate with Akka Remote Actor

This is my first video tutorials on Akka Remoting. There are multiples combinations for creating Akka Remote actor and communicate with them. In this tutorials, we are discussing 5 ways for communicate with remote actors. The source code for this examples are available https://github.com/harmeetsingh0013/learning-akka-cluster git hub repo. Please send feedback on comments. I hope you guys learning new from this video.


Saturday, February 25, 2017

Apache Kafka: Multiple ways for Consume or Read messages from Kafka Topic

In our previous post, we are using Apache Avro for producing messages to the kafka queue or send message to the queue. In this post, we are going to create Kafka consumers for consuming the messages from Kafka queue with avro format. Like in previous post, there are multiple ways for producing the messages, same as with consumer, there are multiple ways for consuming messages from kafka topics.

As per previous post, with avro, we are using confluent registry for managing message schema. Before deserializing message kafka consumer read the schema from registry server and deserialize schema with type safety. If we want to check our schema is schema server, we can hit following end point using any rest tool.


  • http://localhost:8081/subjects (List of all save schema)
  • http://localhost:8081/subjects/<schema-name>/versions/1 (For detail structure of schema)

I: Simple Consumer

Like simple producer, we have simple Consumer for consuming messages produced by simple consumer. The best practices are, we need to follow same way for Producing/Consuming messages from topic. 

public class SimpleConsumer {

    private static Properties kafkaProps = new Properties();

    static {
        kafkaProps.put("bootstrap.servers", "localhost:9092");
        kafkaProps.put(ConsumerConfig.KEY_DESERIALIZER_CLASS_CONFIG, StringDeserializer.class);
        kafkaProps.put(ConsumerConfig.VALUE_DESERIALIZER_CLASS_CONFIG, StringDeserializer.class);
        kafkaProps.put(ConsumerConfig.GROUP_ID_CONFIG, "CustomerCountryGroup");

    }

    private static void infinitePollLoop() {
        try(KafkaConsumer kafkaConsumer = new KafkaConsumer<>(kafkaProps)){
            kafkaConsumer.subscribe(Arrays.asList("CustomerCountry"));
            while(true) {
                ConsumerRecords records = kafkaConsumer.poll(100);
                records.forEach(record -> {
                    System.out.printf("Topic: %s, Partition: %s, Offset: %s, Key: %s, Value: %s",
                            record.topic(), record.partition(), record.offset(), 
record.key(), record.value());
                    System.out.println();

                });
            }
        }
    }

    public static void main(String[] args) {
        infinitePollLoop();
    }
}

II: Apache Avro DeSerialization Generic Format: 

Like Generic format producer, we have same Generic format consumer as well. In consumer, the same thing we need like avro schema or generated POJO class, by any built tools generator or plugin. 

public class AvroGenericConsumer {

    private static Properties kafkaProps = new Properties();

    static {
        // As per my findings 'latest', 'earliest' and 'none' values are used with 
kafka consumer poll.
        kafkaProps.put(ConsumerConfig.AUTO_OFFSET_RESET_CONFIG, "earliest");
        kafkaProps.put("bootstrap.servers", "localhost:9092");
        kafkaProps.put(ConsumerConfig.KEY_DESERIALIZER_CLASS_CONFIG, StringDeserializer.class);
        kafkaProps.put(ConsumerConfig.VALUE_DESERIALIZER_CLASS_CONFIG, KafkaAvroDeserializer.class);
        kafkaProps.put(ConsumerConfig.GROUP_ID_CONFIG, "AvroGenericConsumer-GroupOne");
        kafkaProps.put("schema.registry.url", "http://localhost:8081");
        kafkaProps.put(KafkaAvroDeserializerConfig.SPECIFIC_AVRO_READER_CONFIG, true);
    }

    public static void infiniteConsumer() throws IOException {
        try (KafkaConsumer kafkaConsumer = new KafkaConsumer<>(kafkaProps)) {
            kafkaConsumer.subscribe(Arrays.asList("AvroGenericProducerTopics"));

            while (true) {
                ConsumerRecords records = kafkaConsumer.poll(100);

                records.forEach(record -> {
                    CustomerGeneric customer = (CustomerGeneric) SpecificData.get()
.deepCopy(CustomerGeneric.SCHEMA$, record.value());
                    System.out.println("Key : " + record.key());
                    System.out.println("Value: " + customer);
                });
            }
        }
    }

    public static void main(String[] args) throws IOException {
        infiniteConsumer();
    }
}

III: Apache Avro DeSerialization Specific Format One: 

This example is used for deserializer kafka message with specific format. This deserializer is used with corresponding Apache Avro Serialization Specific Format One in our previous post.  In this we are using Kafka Stream from deserialize the message. There is another simple way for deserialize the message which we will look into next example. 

public class AvroSpecificProducerOne {
    private static Properties kafkaProps = new Properties();
    private static KafkaProducer kafkaProducer;

    static {
        kafkaProps.put("bootstrap.servers", "localhost:9092");
        kafkaProps.put(ProducerConfig.KEY_SERIALIZER_CLASS_CONFIG, StringSerializer.class);
        kafkaProps.put(ProducerConfig.VALUE_SERIALIZER_CLASS_CONFIG, KafkaAvroSerializer.class);
        kafkaProps.put("schema.registry.url", "http://localhost:8081");
        kafkaProducer = new KafkaProducer<>(kafkaProps);
    }

    public static void fireAndForget(ProducerRecord record) {
        kafkaProducer.send(record);
    }

    public static void asyncSend(ProducerRecord record) {
        kafkaProducer.send(record, (recordMetaData, ex) -> {
            System.out.println("Offset: " + recordMetaData.offset());
            System.out.println("Topic: " + recordMetaData.topic());
            System.out.println("Partition: " + recordMetaData.partition());
            System.out.println("Timestamp: " + recordMetaData.timestamp());
        });
    }

    public static void main(String[] args) throws InterruptedException, IOException {
        Customer customer1 = new Customer(1001, "Jimmy");
        Customer customer2 = new Customer(1002, "James");

        ProducerRecord record1 = new ProducerRecord<>("AvroSpecificProducerOneTopic",
                "KeyOne", customer1
        );
        ProducerRecord record2 = new ProducerRecord<>("AvroSpecificProducerOneTopic",
                "KeyOne", customer2
        );

        asyncSend(record1);
        asyncSend(record2);

        Thread.sleep(1000);
    }
}

IV: Apache Avro DeSerialization Specific Format Two: 

This example of deserializer is used to deserialize message from kafka queue by Apache Avro Serialization Specific Format One producer. In the previous example we are using Kafka Streams, But in this, we are using simple way for deserialize the message. 

public class AvroSpecificDeserializerThree {

    private static Properties kafkaProps = new Properties();

    static {
        // As per my findings 'latest', 'earliest' and 'none' values are used with kafka consumer poll.
        kafkaProps.put(ConsumerConfig.AUTO_OFFSET_RESET_CONFIG, "earliest");
        kafkaProps.put("bootstrap.servers", "localhost:9092");
        kafkaProps.put(ConsumerConfig.KEY_DESERIALIZER_CLASS_CONFIG, StringDeserializer.class);
        kafkaProps.put(ConsumerConfig.VALUE_DESERIALIZER_CLASS_CONFIG, KafkaAvroDeserializer.class);
        kafkaProps.put(ConsumerConfig.GROUP_ID_CONFIG, "AvroSpecificDeserializerThree-GroupOne");
        kafkaProps.put("schema.registry.url", "http://localhost:8081");
        kafkaProps.put(KafkaAvroDeserializerConfig.SPECIFIC_AVRO_READER_CONFIG, true);
    }

    public static void infiniteConsumer() throws IOException {
        try (KafkaConsumer kafkaConsumer = new KafkaConsumer<>(kafkaProps)) {
            kafkaConsumer.subscribe(Arrays.asList("AvroSpecificProducerOneTopic"));

            while (true) {
                ConsumerRecords records = kafkaConsumer.poll(100);

                records.forEach(record -> {
                    Customer customer = record.value();
                    System.out.println("Key : " + record.key());
                    System.out.println("Value: " + customer);
                });
            }
        }
    }

    public static void main(String[] args) throws IOException {
        infiniteConsumer();
    }
}


V: Apache Avro DeSerialization Specific Format Three: 

In this example we deserialize our messages from kafka with some Specific format. This is used for Apache Avro Serialization Specific Format Two producer in our previous post.

public class AvroSpecificDeserializerTwo {

    private static Properties kafkaProps = new Properties();

    static {
        // As per my findings 'latest', 'earliest' and 'none' values are used with kafka consumer poll.
        kafkaProps.put(ConsumerConfig.AUTO_OFFSET_RESET_CONFIG, "earliest");
        kafkaProps.put("bootstrap.servers", "localhost:9092");
        kafkaProps.put(ConsumerConfig.KEY_DESERIALIZER_CLASS_CONFIG, StringDeserializer.class);
        kafkaProps.put(ConsumerConfig.VALUE_DESERIALIZER_CLASS_CONFIG, KafkaAvroDeserializer.class);
        kafkaProps.put(ConsumerConfig.GROUP_ID_CONFIG, "AvroSpecificDeserializerTwo-GroupOne");
        kafkaProps.put("schema.registry.url", "http://localhost:8081");
        kafkaProps.put(KafkaAvroDeserializerConfig.SPECIFIC_AVRO_READER_CONFIG, true);
    }

    public static void infiniteConsumer() throws IOException {
        try (KafkaConsumer kafkaConsumer = new KafkaConsumer<>(kafkaProps)) {
            kafkaConsumer.subscribe(Arrays.asList("AvroSpecificProducerTwoTopic"));

            while (true) {
                ConsumerRecords records = kafkaConsumer.poll(100);

                records.forEach(record -> {
                    DatumReader customerDatumReader = new SpecificDatumReader<>(Customer.SCHEMA$);
                    BinaryDecoder binaryDecoder = DecoderFactory.get().binaryDecoder(record.value(), null);
                    try {
                        Customer customer = (Customer) customerDatumReader.read(null, binaryDecoder);
                        System.out.println("Key : " + record.key());
                        System.out.println("Value: " + customer);
                    } catch (IOException e) {
                        e.printStackTrace();
                    }
                });
            }
        }
    }

    public static void main(String[] args) throws IOException {
        infiniteConsumer();
    }
}

Still there are lots of ways for Produce/Consume messages from kafka. Some of the way we are discuss here, for other, may be we will come with new posts. Please feel free for sending feedback and post the comments. 


References: 

Apache Kafka: Multiple ways for Produce or Push Message to Kafka topics

Today, I am going to describe what are the various ways in Apache kafka, for put the messages into topics. Apache Kafka have supports for several languages and also provide api's for Java, one of the reason is, Java is the primary language of JVM and most of the JVM based languages have full support for using Java libraries easily.

Kafka have a concept of topics, partitions etc. which you can explore from Apache kafka documentation or Confluent documentation. For put messages in kafka queue, kafka supports serialization and various formats for messages. Some of the formats kafka provides by default, but for kafka recommended format is Apache Avro. Avro is a lightweight and type safe format for serialized data. For more, you can explore apache avro.

Kafka have a concept of Producer/Consumer. Producer produce the data to queue and Consumer consume the data from queue. Today we are creating various Kafka Producers for produce data in kafka topic.

Prerequisite:

  • Install JDK 8.
  • Download Apache Kafka.
  • Download Zookeeper.
  • Download Confluent Kafka Kit. 
  • IDE
  • Build Tool ( We are using SBT) 

I. Simple Producer: 

First, we are creating kafka simple producer for producing messages to the kafka topic using java. 

public class SimpleProducer {

    private static Properties kafkaProps = new Properties();
    private static KafkaProducer kafkaProducer;

    static {
        kafkaProps.put("bootstrap.servers", "localhost:9092");
        kafkaProps.put(ProducerConfig.KEY_SERIALIZER_CLASS_CONFIG, StringSerializer.class);
        kafkaProps.put(ProducerConfig.VALUE_SERIALIZER_CLASS_CONFIG, StringSerializer.class);
        kafkaProducer = new KafkaProducer<>(kafkaProps);
    }


    public static void fireAndForget(ProducerRecord record) {
        kafkaProducer.send(record);
    }

    public static void asyncSend(ProducerRecord record) {
        kafkaProducer.send(record, (recordMetaData, ex) -> {
            System.out.println("Offset: "+ recordMetaData.offset());
            System.out.println("Topic: "+ recordMetaData.topic());
            System.out.println("Partition: "+ recordMetaData.partition());
            System.out.println("Timestamp: "+ recordMetaData.timestamp());
        });
    }

    public static void main(String[] args) throws InterruptedException {
        ProducerRecord record1 = new ProducerRecord<>("CustomerCountry",
        "Record 1", "Japan1"
        );

        ProducerRecord record2 = new ProducerRecord<>("CustomerCountry",
                "Record 2", "Punjab1"
        );

        fireAndForget(record1);
        asyncSend(record2);

        Thread.sleep(10000);
    }
}

In this example, we are just produce the data into queue with Kafka Default serialization `StringSerializer`.

II. Apache Avro Serialization Generic Format: 

For using Apache Avro, we need to create schema for our messages, because that schema help us for deserialize messages with type safety. For using avro, there are various build tools plugins, provide's us for generate our POJO classes from avro schema file. For good practices, we must use that tools, because some time our messages may too complex and for manually, we are always going with a mistake.

NOTE: For using avro, we need to start confluent registry server, because that registry server is used to manage messages schema's and our messages are managed by kafka queues. For more details, please visit documentation.

For SBT, I am using sbt-avro plugin. Its depends on you, which build tool you are using or you can write manually also. 
Like we discuss, for avro we need to create schema first like in my example i have following schema: 

{"namespace": "com.harmeetsingh13.java",
    "type": "record",
    "name": "Customer",
    "fields": [{"name": "id","type": "int"},
            {"name": "name","type": "string"}]
}

By using sbt-avro plugin, my pojo class is generated automatically. Now, we are creating our Kafka Producer by using Avro.

public class AvroSpecificProducerOne {
    private static Properties kafkaProps = new Properties();
    private static KafkaProducer kafkaProducer;

    static {
        kafkaProps.put("bootstrap.servers", "localhost:9092");
        kafkaProps.put(ProducerConfig.KEY_SERIALIZER_CLASS_CONFIG, StringSerializer.class);
        kafkaProps.put(ProducerConfig.VALUE_SERIALIZER_CLASS_CONFIG, KafkaAvroSerializer.class);
        kafkaProps.put("schema.registry.url", "http://localhost:8081");
        kafkaProducer = new KafkaProducer<>(kafkaProps);
    }

    public static void fireAndForget(ProducerRecord record) {
        kafkaProducer.send(record);
    }

    public static void asyncSend(ProducerRecord record) {
        kafkaProducer.send(record, (recordMetaData, ex) -> {
            System.out.println("Offset: " + recordMetaData.offset());
            System.out.println("Topic: " + recordMetaData.topic());
            System.out.println("Partition: " + recordMetaData.partition());
            System.out.println("Timestamp: " + recordMetaData.timestamp());
        });
    }

    public static void main(String[] args) throws InterruptedException, IOException {
        Customer customer1 = new Customer(1001, "Jimmy");
        Customer customer2 = new Customer(1002, "James");

        ProducerRecord record1 = new ProducerRecord<>("AvroSpecificProducerOneTopic",
                "KeyOne", customer1
        );
        ProducerRecord record2 = new ProducerRecord<>("AvroSpecificProducerOneTopic",
                "KeyOne", customer2
        );

        asyncSend(record1);
        asyncSend(record2);

        Thread.sleep(1000);
    }
}

In this example, the one thing we need to note about is that, for serializing our message key, we are still using Kafka  `StringSerializer` class, because when we deserialize our string value using Avro `KafkaAvroDeserializer` we are facing this issue:

Error deserializing Avro message for id 351 org.apache.kafka.common.errors.SerializationException: 
Error deserializing Avro message for id 351 Caused org.apache.kafka.common.errors.SerializationException: 
string specified by the writers schema could not be instantiated to find the readers schema

For more details, you look into this discussion. 

As we are discuss, There are various ways for  serialize messages to kafka queue using avro. I the above example we are using Generic way for message serialization but we can serialize messages with more specific way also. Which we are discuss in our next examples.

III: Apache Avro Serialization Specific Format One: 

Another avro example is for serialize messages with one specific way as below:

public class AvroSpecificProducerOne {
    private static Properties kafkaProps = new Properties();
    private static KafkaProducer kafkaProducer;

    static {
        kafkaProps.put("bootstrap.servers", "localhost:9092");
        kafkaProps.put(ProducerConfig.KEY_SERIALIZER_CLASS_CONFIG, StringSerializer.class);
        kafkaProps.put(ProducerConfig.VALUE_SERIALIZER_CLASS_CONFIG, KafkaAvroSerializer.class);
        kafkaProps.put("schema.registry.url", "http://localhost:8081");
        kafkaProducer = new KafkaProducer<>(kafkaProps);
    }

    public static void fireAndForget(ProducerRecord record) {
        kafkaProducer.send(record);
    }

    public static void asyncSend(ProducerRecord record) {
        kafkaProducer.send(record, (recordMetaData, ex) -> {
            System.out.println("Offset: " + recordMetaData.offset());
            System.out.println("Topic: " + recordMetaData.topic());
            System.out.println("Partition: " + recordMetaData.partition());
            System.out.println("Timestamp: " + recordMetaData.timestamp());
        });
    }

    public static void main(String[] args) throws InterruptedException, IOException {
        Customer customer1 = new Customer(1001, "Jimmy");
        Customer customer2 = new Customer(1002, "James");

        ProducerRecord record1 = new ProducerRecord<>("AvroSpecificProducerOneTopic",
                "KeyOne", customer1
        );
        ProducerRecord record2 = new ProducerRecord<>("AvroSpecificProducerOneTopic",
                "KeyOne", customer2
        );

        asyncSend(record1);
        asyncSend(record2);

        Thread.sleep(1000);
    }
}

IV: Apache Avro Serialization Specific Format Two: 

Another way for serialize messages using avro as below: 

public class AvroSpecificProducerTwo {

    private static Properties kafkaProps = new Properties();
    private static KafkaProducer kafkaProducer;

    static {
        kafkaProps.put("bootstrap.servers", "localhost:9092");
        kafkaProps.put(ProducerConfig.KEY_SERIALIZER_CLASS_CONFIG, StringSerializer.class);
        kafkaProps.put(ProducerConfig.VALUE_SERIALIZER_CLASS_CONFIG, KafkaAvroSerializer.class);
        kafkaProps.put("schema.registry.url", "http://localhost:8081");
        kafkaProducer = new KafkaProducer<>(kafkaProps);
    }

    public static void fireAndForget(ProducerRecord record) {
        kafkaProducer.send(record);
    }

    public static void asyncSend(ProducerRecord record) {
        kafkaProducer.send(record, (recordMetaData, ex) -> {
            System.out.println("Offset: " + recordMetaData.offset());
            System.out.println("Topic: " + recordMetaData.topic());
            System.out.println("Partition: " + recordMetaData.partition());
            System.out.println("Timestamp: " + recordMetaData.timestamp());
        });
    }

    private static byte[] convertCustomerToAvroBytes(Customer customer) throws IOException {
        Parser parser = new Parser();
        Schema schema = parser.parse(AvroSpecificProducerOne.class
                .getClassLoader().getResourceAsStream("avro/customer.avsc"));

        SpecificDatumWriter writer = new SpecificDatumWriter<>(schema);
        try (ByteArrayOutputStream os = new ByteArrayOutputStream()) {
            BinaryEncoder encoder = EncoderFactory.get().binaryEncoder(os, null);
            writer.write(customer, encoder);
            encoder.flush();

            return os.toByteArray();
        }
    }

    public static void main(String[] args) throws InterruptedException, IOException {
        Customer customer1 = new Customer(1001, "Jimmy");
        Customer customer2 = new Customer(1002, "James");


        byte[] customer1AvroBytes = convertCustomerToAvroBytes(customer1);
        byte[] customer2AvroBytes = convertCustomerToAvroBytes(customer2);

        ProducerRecord record1 = new ProducerRecord<>("AvroSpecificProducerTwoTopic",
                "KeyOne", customer1AvroBytes
        );
        ProducerRecord record2 = new ProducerRecord<>("AvroSpecificProducerTwoTopic",
                "KeyOne", customer2AvroBytes
        );

        asyncSend(record1);
        asyncSend(record2);

        Thread.sleep(1000);
    }
}

There are still multiple ways for serialize messages using avro or other message serializer for kafka. In the next post, we will discuss kafka consumers and various way for consume messages from kafka queue using avro.

For above examples, you can download code from github repo also. 

Tuesday, February 7, 2017

Building Microservices Based Enterprise Applications in Java Using Lagom - Part I

As we know, now days, most of the enterprise applications design as a "Microservices Architecture" because of scalability, sharding, loosely-coupling and many others reasons are there. On the other hand  JavaEE help us for building an Enterprise Applications. As we know, Java help us for building a good applications, but with JavaEE monolithic approach our applications are not scalable as compare to microservices.
That's why, Lagom comes into picture. Lagom provides a way for building an Enterprise Application with design of Microservices based architecture and also give us Responsive, Resilient, Elastic and Message Driven features or in other words a Reactive Approach. Lagom design philosophy as :

  1. Asynchronous.
  2. Distributed Persistent.
  3. Developer Productivity.

In this blog, we are building a sample application, for managing user module and performing CRUD on user. 

Note: Lagom gives us strict approach for designing applications with Domain Driven Design (DDD) manner and also follow CQRS for event sourcing.

Step-I: 

We are building a maven based project using Lagom and our project structure is as below: 


Step - II

As we know, Lagom follow DDD approach, so in maven based project we are creating submodules according to our domain. In, sample, we are managing user domain, so, we are creating two maven sub modules as "user-api" and "user-impl". user-api contains just specification and declarations of methods for our rest endpoints and in user-impl we actually implements, implementation of services. 
In user-api, we are creating a class "UserService" and declare our all end points as below code:

public interface UserService extends Service {

    ServiceCall> user(String id);

    ServiceCall newUser();

    ServiceCall updateUser();

    ServiceCall delete(String id);

    ServiceCall> currentState(String id);

    @Override
    default Descriptor descriptor() {

        return named("user").withCalls(
                restCall(GET, "/api/user/:id", this::user),
                restCall(POST, "/api/user", this::newUser),
                restCall(PUT, "/api/user", this::updateUser),
                restCall(DELETE, "/api/user/:id", this::delete),
                restCall(GET, "/api/user/current-state/:id", this::currentState)
        ).withAutoAcl(true);
    }
}

Step III

Now in our user-impl module we are giving implementation of all services. For design a services, Lagom provide us strict model for following DDD. According to DDD we need Entities, Commands, Events and more. Initially we need to define commands for our module as below: 


public interface UserCommand extends Jsonable {

    @Value
    @Builder
    @JsonDeserialize
    final class CreateUser implements UserCommand, PersistentEntity.ReplyType {
        User user;
    }

    @Value
    @Builder
    @JsonDeserialize
    final class UpdateUser implements UserCommand, PersistentEntity.ReplyType {
        User user;
    }

    @Value
    @Builder
    @JsonDeserialize
    final class DeleteUser implements UserCommand, PersistentEntity.ReplyType {
        User user;
    }

    @Immutable
    @JsonDeserialize
    final class UserCurrentState implements UserCommand, PersistentEntity.ReplyType> {}
}
For designing a pojos in Java, I am using Lombok library for creating immutables classes and remove boilerplate code. Lagom also provide us other options as well mention in documentations.

Note: You can use any library, but before using, configure your IDE according to library.

Step IV

We are following CQRS, so we need to define events as well: 

public interface UserEvent extends Jsonable, AggregateEvent {

    @Override
    default AggregateEventTagger aggregateTag() {
        return UserEventTag.INSTANCE;
    }

    @ValueEvent
    @Builder
    @JsonDeserialize
    final class UserCreated implements UserEvent, CompressedJsonable {
        User user;
        String entityId;
    }

    @Value
    @Builder
    @JsonDeserialize
    final class UserUpdated implements UserEvent, CompressedJsonable {
        User user;
        String entityId;
    }

    @Value
    @Builder
    @JsonDeserialize
    final class UserDeleted implements UserEvent, CompressedJsonable {
        User user;
        String entityId;
    }
}

Our events must be in compress form, because we need to persist hole event in db. For more details go through lagom documentation.

Step V

We need to define our entity, and define behaviors according to commands and events as below: 

public class UserEntity extends PersistentEntity {

    @Override
    public Behavior initialBehavior(Optional snapshotState) {

        // initial behaviour of user
        BehaviorBuilder behaviorBuilder = newBehaviorBuilder(
                UserState.builder().user(Optional.empty())
                        .timestamp(LocalDateTime.now().toString()).build()
        );

        behaviorBuilder.setCommandHandler(CreateUser.class, (cmd, ctx) ->
                ctx.thenPersist(UserCreated.builder().user(cmd.getUser())
                        .entityId(entityId()).build(), evt -> ctx.reply(Done.getInstance()))
        );

        behaviorBuilder.setEventHandler(UserCreated.class, evt ->
                UserState.builder().user(Optional.of(evt.getUser()))
                        .timestamp(LocalDateTime.now().toString()).build()
        );

        behaviorBuilder.setCommandHandler(UpdateUser.class, (cmd, ctx) ->
                ctx.thenPersist(UserUpdated.builder().user(cmd.getUser()).entityId(entityId()).build()
                        , evt -> ctx.reply(Done.getInstance()))
        );

        behaviorBuilder.setEventHandler(UserUpdated.class, evt ->
                UserState.builder().user(Optional.of(evt.getUser()))
                        .timestamp(LocalDateTime.now().toString()).build()
        );

        behaviorBuilder.setCommandHandler(DeleteUser.class, (cmd, ctx) ->
                ctx.thenPersist(UserDeleted.builder().user(cmd.getUser()).entityId(entityId()).build(),
                        evt -> ctx.reply(cmd.getUser()))
        );

        behaviorBuilder.setEventHandler(UserDeleted.class, evt ->
                UserState.builder().user(Optional.empty())
                        .timestamp(LocalDateTime.now().toString()).build()
        );

        behaviorBuilder.setReadOnlyCommandHandler(UserCurrentState.class, (cmd, ctx) ->
                ctx.reply(state().getUser())
        );

        return behaviorBuilder.build();
    }
}

By default, Lagom recommendations are using Cassandra for events storing. But Lagom also support RDBMS as well. For more details please click on this link.
Here we define our implementation of commands and events. In simple words, here we decide what will happen with specific command and what will happen with specific event and maintain the state in memory.

Step VI

Sometimes, we also need to persist our data separately as well as events, in that case lagom provide us "ReadSideProcessor" abstract class perform operations according to events happened just like below: 

  
public class UserEventProcessor extends ReadSideProcessor {

    private static final Logger LOGGER = LoggerFactory.getLogger(UserEventProcessor.class);

    private final CassandraSession session;
    private final CassandraReadSide readSide;

    private PreparedStatement writeUsers;
    private PreparedStatement deleteUsers;

    @Inject
    public UserEventProcessor(final CassandraSession session, final CassandraReadSide readSide) {
        this.session = session;
        this.readSide = readSide;
    }

    @Override
    public PSequence> aggregateTags() {
        LOGGER.info(" aggregateTags method ... ");
        return TreePVector.singleton(UserEventTag.INSTANCE);
    }

    @Override
    public ReadSideHandler buildHandler() {
        LOGGER.info(" buildHandler method ... ");
        return readSide.builder("users_offset")
                .setGlobalPrepare(this::createTable)
                .setPrepare(evtTag -> prepareWriteUser()
                        .thenCombine(prepareDeleteUser(), (d1, d2) -> Done.getInstance())
                )
                .setEventHandler(UserCreated.class, this::processPostAdded)
                .setEventHandler(UserUpdated.class, this::processPostUpdated)
                .setEventHandler(UserDeleted.class, this::processPostDeleted)
                .build();
    }

    // Execute only once while application is start
    private CompletionStage createTable() {
        return session.executeCreateTable(
                "CREATE TABLE IF NOT EXISTS users ( " +
                        "id TEXT, name TEXT, age INT, PRIMARY KEY(id))"
        );
    }

    /*
    * START: Prepare statement for insert user values into users table.
    * This is just creation of prepared statement, we will map this statement with our event
    */
    private CompletionStage prepareWriteUser() {
        return session.prepare(
                "INSERT INTO users (id, name, age) VALUES (?, ?, ?)"
        ).thenApply(ps -> {
            setWriteUsers(ps);
            return Done.getInstance();
        });
    }

    private void setWriteUsers(PreparedStatement statement) {
        this.writeUsers = statement;
    }

    // Bind prepare statement while UserCreate event is executed
    private CompletionStage> processPostAdded(UserCreated event) {
        BoundStatement bindWriteUser = writeUsers.bind();
        bindWriteUser.setString("id", event.getUser().getId());
        bindWriteUser.setString("name", event.getUser().getName());
        bindWriteUser.setInt("age", event.getUser().getAge());
        return CassandraReadSide.completedStatements(Arrays.asList(bindWriteUser));
    }
    /* ******************* END ****************************/

    /* START: Prepare statement for update the data in users table.
    * This is just creation of prepared statement, we will map this statement with our event
    */
    private CompletionStage> processPostUpdated(UserUpdated event) {
        BoundStatement bindWriteUser = writeUsers.bind();
        bindWriteUser.setString("id", event.getUser().getId());
        bindWriteUser.setString("name", event.getUser().getName());
        bindWriteUser.setInt("age", event.getUser().getAge());
        return CassandraReadSide.completedStatements(Arrays.asList(bindWriteUser));
    }
    /* ******************* END ****************************/

    /* START: Prepare statement for delete the the user from table.
    * This is just creation of prepared statement, we will map this statement with our event
    */
    private CompletionStage prepareDeleteUser() {
        return session.prepare(
                "DELETE FROM users WHERE id=?"
        ).thenApply(ps -> {
            setDeleteUsers(ps);
            return Done.getInstance();
        });
    }

    private void setDeleteUsers(PreparedStatement deleteUsers) {
        this.deleteUsers = deleteUsers;
    }

    private CompletionStage> processPostDeleted(UserDeleted event) {
        BoundStatement bindWriteUser = deleteUsers.bind();
        bindWriteUser.setString("id", event.getUser().getId());
        return CassandraReadSide.completedStatements(Arrays.asList(bindWriteUser));
    }
    /* ******************* END ****************************/
}

Fore more details, please click on link.

Step VII

Finally we are going to define implementation of our rest service endpoints as below: 


public class UserServiceImpl implements UserService {

    private final PersistentEntityRegistry persistentEntityRegistry;
    private final CassandraSession session;

    @Inject
    public UserServiceImpl(final PersistentEntityRegistry registry, ReadSide readSide, CassandraSession session) {
        this.persistentEntityRegistry = registry;
        this.session = session;

        persistentEntityRegistry.register(UserEntity.class);
        readSide.register(UserEventProcessor.class);
    }

    @Override
    public ServiceCall> user(String id) {
        return request -> {
            CompletionStage> userFuture =
                    session.selectAll("SELECT * FROM users WHERE id = ?", id)
                            .thenApply(rows ->
                                    rows.stream()
                                            .map(row -> User.builder().id(row.getString("id"))
                                                    .name(row.getString("name")).age(row.getInt("age"))
                                                    .build()
                                            )
                                            .findFirst()
                            );
            return userFuture;
        };
    }

    @Override
    public ServiceCall newUser() {
        return user -> {
            PersistentEntityRef ref = userEntityRef(user);
            return ref.ask(CreateUser.builder().user(user).build());
        };
    }

    @Override
    public ServiceCall updateUser() {
        return user -> {
            PersistentEntityRef ref = userEntityRef(user);
            return ref.ask(UpdateUser.builder().user(user).build());
        };
    }

    @Override
    public ServiceCall delete(String id) {
        return request -> {
            User user = User.builder().id(id).build();
            PersistentEntityRef ref = userEntityRef(user);
            return ref.ask(DeleteUser.builder().user(user).build());
        };
    }

    @Override
    public ServiceCall> currentState(String id) {
        return request -> {
            User user = User.builder().id(id).build();
            PersistentEntityRef ref = userEntityRef(user);
            return ref.ask(new UserCurrentState());
        };
    }

    private PersistentEntityRef userEntityRef(User user) {
        return persistentEntityRegistry.refFor(UserEntity.class, user.getId());
    }
}

There are still lots of things Lagom provide us, for developing enterprise applications. Which we will cover in our next blog.

Full source of this example, please click on link.  

Friday, September 23, 2016

Kick-Off Java 9 (Project Jigsaw) Part - I

Now a day's monolithic applications comes into micro batches. Every micro batch independent from each others and deploy. Now the Java will come in this flavor using project Jigsaw

Java 9 comes with great feature call "Jigsaw", which modularize monolithic Java code into modules. Where we design independently standard modules with in different scopes. Primary goal of "jigsaw" to make scalability, maintainability, performance, security etc. For more information please click on this link.

Today we creating just a greeting example using project "Jigsaw" or modularize our code independently.

Prerequisite


Step - I

Create a source directory for our source code:
$ mkdir -p jigsaw-sample1/src

Step - II

Categories our system into modules like in this example, i have one utility module and other main module. The utility module contains utility classes and main module access that utility class and their methods for performing operations.
jigsaw-sample1/src $ mkdir com.knoldus.util com.knoldus.main
Before jigsaw, we module our project using packages but still we have monolithic structure. Our package conventions is reverse domain of company. Jigsaw still recommend that convention.

From above command we are creating two directories, which is basically our project modularization. These are two independent modules and for packaging, two independent jar. which we will see later.

Thursday, September 22, 2016

Scala Future Under The Hood

In the previous post , i was discussing about Scala ExecutionContext. As we know, for multithreading we need to maintain thread pools using ExecutionContext and by default ForkJoinPool is used because for accessing “multi core” processor. There are multiple thread pools are available in our java.util.concurrent.Executors utility class and as per our requirement we can create new one also.

After all, Scala have concept of Future. Why? In multithreading programming, large or heavy processes were executed on background or in new threads, but the most common problem we are facing is to handle return values from separate thread or handle exceptions or errors. This is the reason, some time developers starts heavy process in synchronized way because we need to access the values after computation and handle exceptions or more.

Note: Scala Future is the rich concept for handling multiple thread and there values after computations or handling error or exceptions if something happen in separate thread.
In scala api’s, Future is a trait and Future also has its companion object which has following apply method.

def apply[T](body: => T) (implicit executor: ExecutionContext): Future[T]
apply method accept future body as named parameter and ExecutionContext as implicit parameter because when future starts to process the body, it will execute the body in separate thread or (asynchronously) by using ExecutionContext.

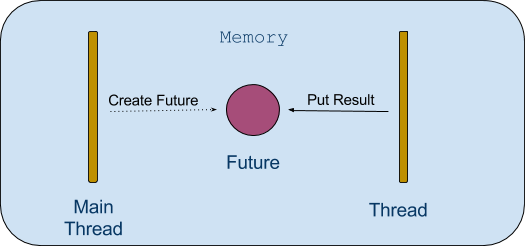
In simple words, Future is a placeholder, that is, a memory location for the value. This placeholder does not need to contain a value when the future is created. The value can be placed into the future eventually when the processing is done.

Let we assume, i have a method called renderPage and return content of web page as Future[String]:

def renderPage(path: String): Future[String] = {
    Future { ……………….. }
}
When the method calls, the Future singleton object followed by a block is a syntactic sugar for calling the Future.apply method. The Future.apply method acts similar as asynchronously. Its starts process in separate thread and render the content of webpage and place the webpage content into the Future when they become available. Following is the just a conceptual diagram for this example:

Thread and Space (3)

This removes blocking from the renderPage method, but it is not clean how the calling thread can extract the content from Future ?

Polling is one of way , In which the calling thread calls a special method to block until the values becomes available. While this approach does not eliminate blocking, it transfer the responsibility of blocking from renderPage method to the caller thread (Main Thread).
Future Polling Example:

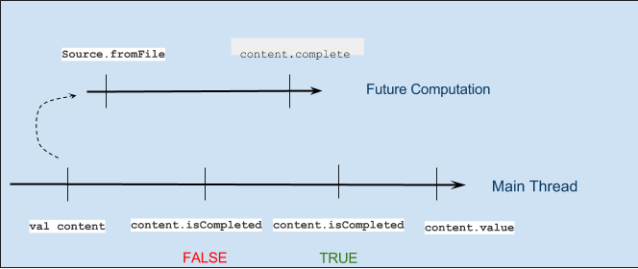
def futurePooling: Unit = {
    val content = Future { scala.io.Source.fromFile("/home/harmeet/sample").mkString }
    println("Start reading the file asynchronously")
    println(s"Future status: ${content.isCompleted}")
    Thread.sleep(250)
    println(s"Future status: ${content.isCompleted}")
    println(s"Future value: ${content.value}")
}

In example we are using method which are performing polling for us and after check its completion status, we are fetching the values using method.

def isCompleted: Boolean
def value: Option[Try[T]]

Note: Polling is like calling your potentials employer every 5 minutes to ask if you’re hired
The conceptual diagram for our pooling mechanism as below:

Pooling Example Flow

Scala Futures have allow additional ways for handling future values and avoid blocking. For more information please click on link

References:
  1. Java api’s docs.

Java Executor Vs Scala ExecutionContext

Java supports low-level of concurrency and some of rich api’s which is just a wrapper of low-level constructs like wait, notify, synchronize etc, But with Java concurrent packages Scala have high level concurrency frameworks for “which goal to achieve, rather than how to achieve“. These types of programming paradigms are “Asynchronous programming using Futures“, “Reactive programming using event streams“, “Actor based programming” and more.
Note: Thread creation is much more expensive then allocating a single object, acquiring a monitor lock or updating an entry in a collection.
For high-performance multi-threading application we should use single thread for handling many requests and a set of such reusable threads usually called thread pool.

400px-Thread_pool

In java, Executor is a interface for encapsulate the decision of how to run concurrently executable work tasks, with an abstraction. In other words, this interface provides a way of decoupling task submission from the mechanics of how each task will be run, including details of thread use, scheduling, etc

interface Executor{
    public void execute(Runnable command)
}

Java Executor :
    leader
  1. Executor decide on which thread and when to call run method of Runnable object.
  2. Executor object can start a new thread specifically for this invocation of execute or even the execute the Runnable object directly on the caller thread.
  3. Tasks scheduling is depends on implementation of Executor.
  4. ExecutorService is a sub interface of Executor for manage termination and methods that can produce a future for tracking progress of one or more asynchronous tasks.
  5. In Java some basic Executor implementations are ThreadPoolExecutor (JDK 5), ForkJoinPoll (JDK 7) etc or developers should are provide custom implementation of Executor.
scala.concurrent package defines the ExecutionContext trait that offers a similar functionality of that Executor object but it more specific to Scala. Scala object take ExecutionContext object as implicit parameter. ExecutionContext have two abstract method execute(same as Java Executor method) and reportFailure (takes Throwable object and is called whenever some tasks throw an exception)

trait ExecutionContext {
    def execute(runnable: Runnable): Unit
    def reportFailure(cause: Throwable): Unit
}
Scala ExecutionContext:
  1. ExecutionContext also have an companion object which have some methods for creating ExecutionContext object from Java Executor or ExecutorService (act as a bridge between Java and Scala)
  2. ExecutionContext companion object contains the default execution context called global which internally uses a ForkJoinPool instance.
The Executor and ExecutionContext object are a attractive concurrent programming abstraction, but they are not without culprits. They can improve throughputs by reusing the same set of threads for different tasks but are unable to execute tasks if those threads becomes unavailable, because all thread are busy with running other tasks.
Note: java.util.concurrent.Executors is a utility class, which is used to create create thread pool according to requirements.
References:
  1. Java api’s docs.

Sunday, October 11, 2015

Spring Security Expression: Secure URL Dynamically According to Users and Permissions.

Introduction:

Today's we discuss about for securing URL using Spring-Security-Expression at Run Time in Application. Using ACL security we can set URL and permissions like read-write permissions per user but some time we just secure URL, there is no issue with Read and Write permission. That time, there is no need for using ACL security, because ACL have some complexity for implementation. But with the Spring-Security-Expression handler, we can easily secure urls by calling custom functions.

Step 1:

Create tables for User and UserPermssion as below: 
CREATE TABLE `users` (
  `id` bigint(20) NOT NULL,
  `name` varchar(45) DEFAULT NULL,
  `role` varchar(45) DEFAULT NULL,
  `email` varchar(256) DEFAULT NULL,
  `password` varchar(256) DEFAULT NULL,
  PRIMARY KEY (`id`)
) ENGINE=InnoDB DEFAULT CHARSET=latin1;

CREATE TABLE `users_permissions` (
  `id` varchar(100) NOT NULL,
  `user_id` bigint(20) NOT NULL,
  `url` varchar(300) NOT NULL,
  `permission` enum('ACCESS','DENIED') NOT NULL,
  PRIMARY KEY (`user_id`,`url`),
  KEY `fk_users_permissions_1_idx` (`user_id`),
  CONSTRAINT `fk_users_permissions_1` FOREIGN KEY (`user_id`) REFERENCES `users` (`id`) ON DELETE CASCADE ON UPDATE CASCADE
) ENGINE=InnoDB DEFAULT CHARSET=latin1;


You can also import sample data from SQL script using this link.

Step 2:

We are using Spring Java Based configuration. Our first requirement is to enable Spring-Security-Expression in our Application using following code in our security configuration file:

@EnableGlobalMethodSecurity(prePostEnabled=true)

Step 3:

 Create your custom bean for checking user security permission using database. This can contain method for validate permission and this method is used for Spring-Security-Expression. Following is our bean code:
@Component(value="securityService")
public class SecruityServiceImpl {

 @Autowired
 private UserPermissionRepo userPermissionRepo;
 
 public boolean userHasPermissionForURL(final Authentication auth, String url) {
  User user = (User) auth.getPrincipal();
  List permissions = userPermissionRepo.findByUserAndUrlAndPermission(user, url, CommonEnum.PERMSSION.ACCESS.getPermission());
  return (permissions != null && !permissions.isEmpty())? true: false;
 }
}

Step 4:

Secure our Spring-MVC controller methods using Spring-Security-Expression.  In the following code, we are using @PreAuthorize annotation for validate our expression.

@RequestMapping(value="/section-one", method=RequestMethod.GET)
@PreAuthorize(value="@securityService.userHasPermissionForURL(authentication, '/section-one')")
public String sectionOne() {
 LOG.info("In sectionOne Controller method");
  
 return "user/section-one";
}
 

Step 5:

 We can also secure our URL in user interface. The Spring-Security-Expression hide the link if user have not permission to access the URL. We are using thymeleaf for Spring-Security so, thymeleaf also provide some attribute. We can also use Spring-Security JSTL tag in JSP. For Thymeleaf following is the code.

sec:authorize="@securityService.userHasPermissionForURL(authentication, '/section-one')"

For download a complete code of sample application  access this link.

References:

  • http://docs.spring.io/spring-security/site/docs/current/reference/html/el-access.html
  • http://www.blackpepper.co.uk/spring-security-using-beans-in-spring-expression-language/
  • http://www.borislam.com/2012/08/writing-your-spring-security-expression.html

Monday, May 25, 2015

Scala Oauth 2.0 using Play-Framework 2.3.x with ReactiveMongo

In this post, we are using Oauth2.0 for creating API with Play-Framework 2.3.x , ReactiveMongo-Extensions, Cake-Pattern and Scala-Oauth2-Provider. We are using Oauth-2.0 just for secure my web-serivces using token based Authentication. This sample Oauth application similar behave like Spring-Security-Oauth2.0 for token based authentication. Click here for more detail...

Play-Framework 2.3.x Dynamic Authorization Using Deadbolt-2

In this post, we are using Deadbolt-2 for maintaining dynamic Authorization using Play-Framework 2.3.x, H2 Database and ReactiveMongo-Extensions. We are using Deadbolt-2 for secure our controllers with dynamic authorization. The Deadbolt-2.3.2 version not supported reactivemongo, so we maintain permission using JDBC and rest of data maintain in Mongodb using ReactiveMongo. Our RDBMS tables structure and sample data are declared in conf/evolutions/default director. Click on this link, for more detail....

Saturday, January 24, 2015

Depedencies Injection In Play-Framework 2.2.x Version Using Spring

Introduction:

Hello Friends, today we discuss about "How we use Dependencies Injection With Play-Framework Using JAVA". There are so many languages who have its own framework for developing web application easily and effectively like PHP have Cake-PHP, Zend etc or Python have its DJango etc. These web framework build a good web application easily and quickly, because the major thing is that there is not need to configure application manually, these frameworks are help the developers to create a basic web application struture with couple of seconds and easily customizable. These are Open-Source framework. But still java had not any open-source web framework for build reliable and scalable web-application. 

Explanation:

Now the day's Typesafe launches a Play-Framework for build a "Reactive" application using Java or Scala. Play 1.x build using Java but 2.x build with Scala, The Scala is a hybrid lanugage which have so features and Play uses these features for better performance. For more information about Play click on this link.
Now the day's Reactive Programming is the part of developement. Play is a reactive and follow reacive principles as below: 
  • Responsive
  • Resilient
  • Elastic
  • Message Driven
For basics understanding of reactive go to Reactive Manifesto

Play-Framework have so many features for build a reliable, scalable web applications easily, But the main limitation i feel in the Play-Framework is, the Play does not have its own dependency injection management. Most of the Java developers are habitual with Dependencies Injection because using new in our code is a bad practices. Play-Framework is a scalable, we easily scale our web application with play framework and for dependencies injection we are using third party plug-ins for Dependency Management like Spring, Google Guice etc.

We are trying to integrate Spring Dependency Injection with Play-Framework as below. Our requirements as below:                                                       


  • Download Play Framework
  • Install Java 1.6 or above
  • Eclipse IDE or other Rich Editor

Step 1:

Download the project from Github . Still Play have support for IDE, but some of the Java web developers found the different way for deploy application with play framework. Because for spring we are using tomcat and integrate tomcat with IDE easily and run the application. Play have its own server and we are using command line for run the server and create the application. With IDE we are write our code with rich environment and also debug the application. But still there is dependency of command line. 

NOTE: We are using Play-Framework 2.2 version and we hope in Play-Framework 3.x have its own dependency injection management module.

Step 2:

Download spring depedencies as below: 

 "org.springframework" % "spring-context" % "4.1.3.RELEASE"

NOTE: Play using Scala-Built Tool for build the application and dependencies management. 

Step 3:

For add spring dependencies configuration, we need to create a Global class at the root package and Inherit GlobalSettings class for override some default configurations settings for application. The Global class define some global configurations for application.

NOTE: One application have one Global Class. If we change the class name Global class to another name or change the Package of Global class, the application pick its default configuration because application search global settings class with Global name and on root package.


public class Global extends GlobalSettings{

	private Logger logger = null;	
	private final AnnotationConfigApplicationContext applicationContext = new AnnotationConfigApplicationContext();
	
	public Global() {
		logger = Logger.getLogger("GlobalConfiguration");
		logger.setLevel(Level.ALL);
	}
	
	@Override 
	public void onStart(Application app) {
		super.onStart(app);
		
		logger.info("ON START");
		applicationContext.scan("com.harmeetsingh13");
		applicationContext.refresh();
		
		// This will construct the beans and call any construction lifecycle methods e.g. @PostConstruct
		applicationContext.start();
	}
	
	@Override
	public void onStop(Application app) {
		applicationContext.close();
		
		super.onStop(app);
	}
	
	@Override
	public  A getControllerInstance(Class clazz) throws Exception {
		logger.info("getControllerInstance");
		return applicationContext.getBean(clazz);
	}
}

Sunday, December 7, 2014

Perform CRUD Operations Using Spring-Data-Neo4j.

Introduction:

In this post, we are trying to use Spring-Data-Neo4j with web application to persist the data in the graph form. Spring-Data-Neo4j is the huge wrapper on Neo4j, which is famous graph database community. Neo4j implementation is done by Java , but have support for connectivity with multiple programming languages. Neo4j have two types, one is opensource and other is licensed. 
There are so many graph database engines are available, but still the Neo4j is good product in all open source and have good community support. 

Graph-Database engines are designed in two ways as follow:
  1. Some database engines are native engines, means they store the data in the way of graphs internally. These types of engines are fast and efficient like Neo4j, OrientDB etc 
  2. Some database engines are store the graphs and nodes internally in RDBMS, Object Oriented Database and some other general databases. The example of these graph-database is FoundationDB. These are also called graph layer database. 
In the Graph Database, we create the nodes for store the data and these nodes are connected with each others. Graph Database is the part of No-SQL (Not-Only SQL) but provide ACID operations for store data. For more information go to this link

Graph-Database Storage For RDBMS Developers:

  1. In the table storage, the data is store in the form of records. One table have multiple records. In Graph database one node represent to one record.
  2. In the table storage the one table represent to one entity like User, Address etc and one table have multiple records. In graph storage nodes have labels and we identify multiple records represent to one entity through labels.
  3. In table storage we are use SQL for query the data from tables. In graph storage the query language is depends on graph-db engine like neo4j use cypher query language and orientdb use sql. 
  4. In table storage the relations between tables are manage through primary-key foreign-key relationship for (1:1) and (1:n) or (n:1). If the relation is (m:m) we maintain join tables. In graph-db the relation is by-directional and we also maintain as uni-directional. In these relationship we also set the attributes about relationship, that's why these relationship are called first class relationship. In graph-db relations are individual represent as entity and in graph we easily traverse from different nodes relationship without any headache of sql joins.

Example:

In the example, we are creating a flow to create, delete, read and maintain the relationship between nodes. Our example Technoloy stack as follow: 
  1. Spring-Data-Neo4j
  2. Thymeleaf
  3. Junit with Hamcrest
  4. JDK 8
  5. Google Guava
  6. Project Lombok
NOTE: For run the example, firstly configure project lombok with eclipse. For more information go to this link

Download the example code from github as below:
https://github.com/harmeetsingh0013/Spring-Data-Neo4j-Example

After downloading the code, you need to follow some steps:

  1. Before Import project into eclipse, configure project lombok
  2. Change the database path according to your system in "db.properties" file.
  3. Configure neo4j-community application for check nodes as a graphic layout. Download from this link. After installation set the path of db, that is used by example application. 
  4. At one time, the one instance is used Neo4j database like our application or neo4j-community application. Otherwise you get an exception related for lock the database.
  5. When run the JUNIT test, it run successfully, but nodes are not store permanently. When the actual application is run and save the node, the node persist permanently successfully.
  6. After launch an sample application, click on following URL: http://localhost:8080/neo4j-spring-example-web/save-person


Please give you suggestion in comments.